

Transactions
Read, search, filter, and export every payment your workspace has taken, and drill into individual transaction and receipt details.
Transactions
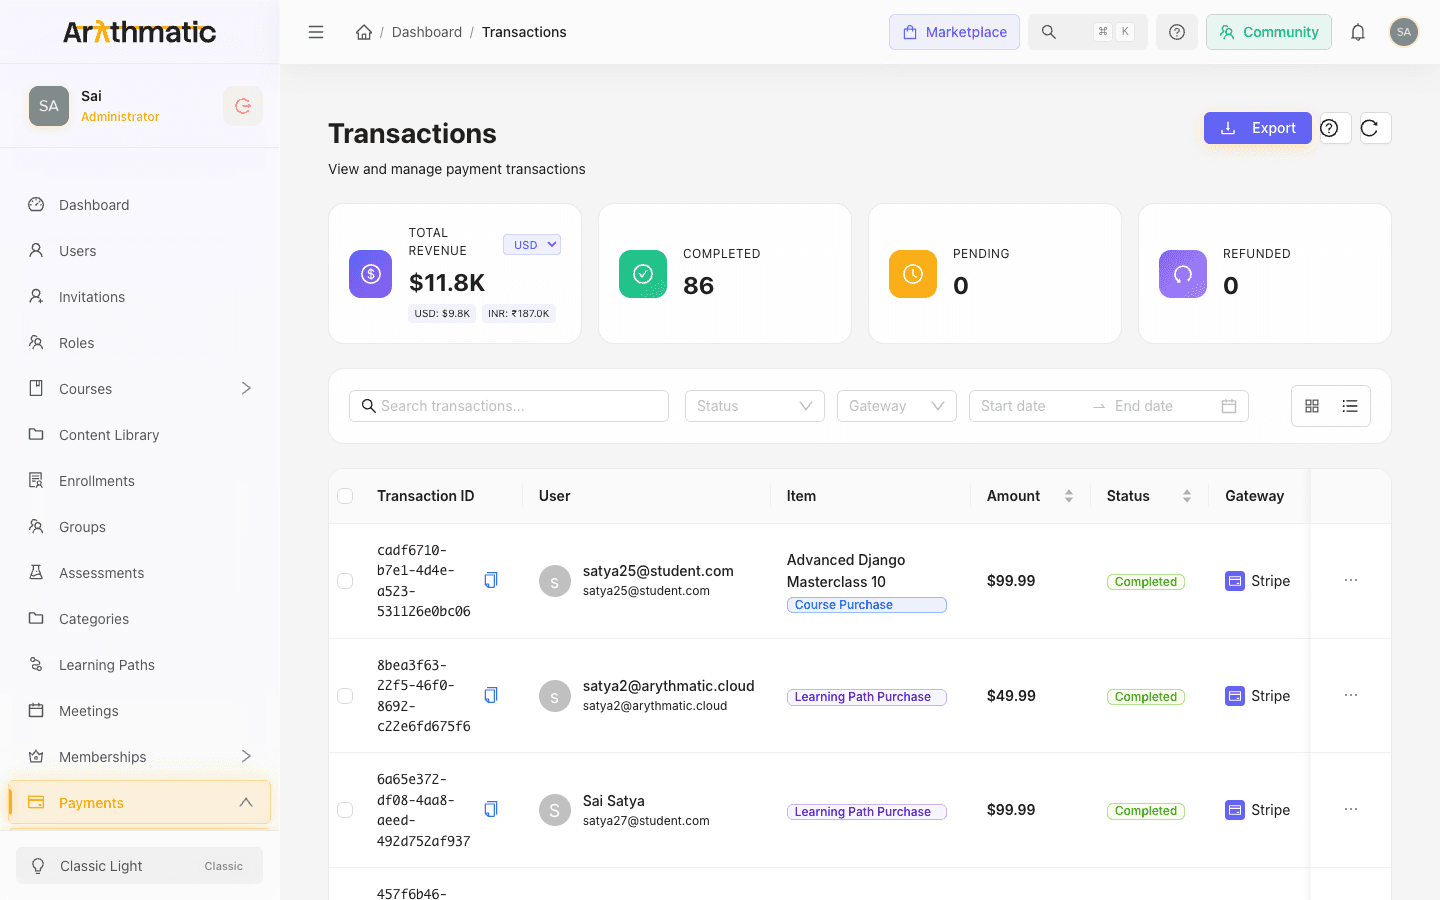
The Transactions page is your workspace's record of every payment learners have made — course purchases, learning path purchases, and membership purchases. Admins use it to check revenue at a glance, find a specific payment, reconcile against a payment gateway, and export data for accounting. Each row (or card) is a single transaction with its own ID, amount, status, and gateway.
Buying a learning path directly is not yet supported at checkout — even when a learning path has a price set, the checkout endpoint returns a "not implemented" error for learning-path purchases. Learners get access to a path's courses by enrolling (or by purchasing the individual courses), not by paying for the path as a single item. Set learning-path pricing with this limitation in mind.
What happens when a payment completes
A successful payment grants access instantly — there is no manual approval or enrollment step. The moment a charge succeeds, the backend does all of the following in one transaction:
- Records the transaction you see on this page.
- Enrolls the learner in the purchased course (or learning path), setting their enrollment status to enrolled — so the course appears in their My Courses immediately.
- Initializes progress for every content item in the course, so completion tracking starts from zero.
- Increments the batch enrollment count when the purchase is for a batch course (and the course's default enrollment batch, when one is enabled).
- Increments the coupon's usage count — but only on a successful payment. An abandoned or failed checkout never consumes a coupon redemption.
- Links a membership enrollment when the learner bought a course at a membership-discounted price, so it counts toward that plan's enrollment total.
Because access is granted automatically on success, you do not need to manually enroll a learner after they pay. If a learner reports they paid but cannot see the course, use Refresh here to confirm the transaction landed as Completed — the enrollment is created in the same step that records the payment.
Reading the summary cards
Four cards sit at the top of the page. They reflect workspace-wide totals returned by a dedicated summary endpoint — not just the specific rows shown on the current page or under the active filters — so the figures stay stable as you page through or narrow the table:
| Card | What it shows |
|---|---|
| Total Revenue | The combined revenue figure. A small currency selector in the card header lets you switch the display currency. |
| Completed | The count of successfully completed transactions. |
| Pending | The count of transactions still awaiting completion. |
| Refunded | The count of refunded transactions. |
The currency toggle
Total Revenue can be expressed in whichever currencies your workspace has actually collected (for example USD and INR). Use the dropdown in the card's top-right corner to pick the display currency. When you have taken payments in more than one currency, a small breakdown appears beneath the total showing each currency's original amount (for example USD: $… INR: ₹…). The converted total uses live exchange rates, so treat it as an indicative figure rather than a booked accounting number.
Switching the currency on the card only changes how the total is displayed — it does not filter the table. To see only the transactions taken in one currency, keep an eye on the amount column, which always shows each transaction in its own original currency.
Searching transactions
Use the Search transactions… box at the top of the filters bar to find a specific payment, then press Enter to run the search. Search is a quick way to locate a transaction by the details the backend indexes (such as a learner or a transaction reference). Clear the box using the clear (×) control to return to the full list.
Press ⌘ + F (or Ctrl + F) to jump straight to the search box without reaching for the mouse.
Filtering
Three filter controls sit next to the search box. They combine — applying more than one narrows the results further.
| Filter | Options |
|---|---|
| Status | Pending, Processing, Completed, Failed, Refunded |
| Gateway | Stripe, Razorpay |
| Date range | Pick a Start date and End date to limit results to that window |
Each filter can be cleared individually. When one or more filters are active, a Clear filters (n) link appears — clicking it resets the search box, Status, Gateway, and date range in a single step.
Card view vs. Table view
Use the view toggle on the right of the filters bar to switch between Card view and Table view. Card view shows each transaction as a compact card (transaction ID, item, learner, gateway, amount, and date, with a colored status stripe down the side). Table view shows the same data as sortable columns. Your choice is remembered as you page through results.
Press V to toggle between card and table view, and use the ← / → arrow keys to move between pages.
The transactions table
In Table view, each transaction is one row with these columns:
| Column | What it shows |
|---|---|
| Transaction ID | The transaction reference in monospace, with a Copy button to copy it to your clipboard. |
| User | The learner's avatar, name, and email address. |
| Item | The purchased item (course, learning path, or membership) with a colored tag showing the purchase type. |
| Amount | The final amount charged in the transaction's own currency. If a discount was applied, the discount amount is shown beneath it. |
| Status | A colored tag — Pending, Processing, Completed, Failed, or Refunded. |
| Gateway | The payment gateway (Stripe or Razorpay) with its badge. |
| Date | The transaction date. |
The Amount, Status, and Date columns are sortable — click the column header to sort. The table defaults to newest transactions first (sorted by date, descending). You can also select rows using the checkboxes on the left.
Row actions
Click the ellipsis (⋯) button at the end of a row to open its action menu:
- View Details — opens the detail panel (see below).
- View Receipt — downloads or opens a receipt for the transaction.
- Request Refund — shown only for Completed transactions. This action is not yet functional from the Transactions list — selecting it currently does nothing. Refund requests today originate from the learner; review and process them on the Refunds screen.
Transaction details
View Details opens a side panel with the full record, grouped into sections:
- Customer — the learner's name and email.
- Purchase — the item, the purchase type, the gateway, and the payment method.
- Amounts — the base amount, any discount, the coupon code used, and the created date.
The panel header repeats the transaction ID, its status, and the final amount so you have the headline figures in view while you read the breakdown.
Exporting
Click Export (top-right of the page) to download the transactions currently loaded as a CSV file named transactions-<date>.csv. The export includes: Transaction ID, User, Email, Item, Type, Amount, Currency, Status, Gateway, and Date — one row per transaction.
Export produces a CSV of the transactions currently loaded in the page, not your entire lifetime history in one file. Apply the Status, Gateway, and date-range filters first to scope the export to exactly the period or gateway you need to reconcile, and export page by page for very large ranges.
Pagination
Results are paged. Below the list, the pagination control shows how many transactions you are viewing out of the total (for example Showing 1–10 of 240 transactions). Use the page controls to move between pages, the page size selector to show 10, 20, 50, or 100 per page, and the quick-jumper to jump directly to a page number.
Refreshing
Click the Refresh button (top-right) to re-fetch the latest transactions — useful right after a learner completes a purchase. The keyboard shortcut is ⌘ + R (or Ctrl + R). Press ⌘ + K at any time to see the full list of keyboard shortcuts.
Related
- Course Pricing — set the prices that drive these transactions
- Learning Path Pricing — bundle pricing for learning paths
- Roles and Permissions — who can view billing and transaction data
